Showing posts with label Matrix Report. Show all posts

Tuesday, November 27, 2012

Barcode in Multiple Columns In RDLC

This article shows how to print barcode in rdlc in multiple columns. The final outcome of this article will be like this one -:
At first design the report than format it accordingly.I have used list control , Textbox and one Image control for this report.
Now, in this report three important things are present.
First one barcode, 2nd one Rupee symbol and the 3rd one is multiple column.
BARCODE :
Now for Barcode just install barcode font like 3o9 etc.And set the font of textbox to barcode font.One thing u must take care that the barcode is prefixed and suffixed by "*". For example if barcode is "000003" then it will be like "*000003*".
RUPEE SYMBOL :
Now for rupee symbol I have just put the image of it. Help for Image.
MULTIPLE COLUMNS :
For this u have to change columns in properties of Body.Rest is the matter of height n width of page and body.The height n width of body is for each column i.e. if here 3 columns are defined then finally page width will be of 3 inches.
Now, go to Report Properties.
Now, In this new window open the layout tab. And change the column to 3 and column spacing to 0.
In my scenario there is a scarcity of space thats why I have set column spacing to "0". You can change it a/c to ur need.
Then set the page width and height to ur need.Standard width=8.5in and height=11in. I have just saved my space by setting "0" to  left,right,top and bottom margin.
Now ur final design will look like this one :
When u run the report output will be like given image.To view the actual output u have to export it to PDF.


Image in RDLC

Show External Images In RDLC
This post is about "How to show images in RDLC?". 
Step 1 : In RDLC just drag n drop image from toolbox.
Step 2 : In property of Image change source to external and in value specify the path of image.
In path u have to put  "file:/// " before the absolute path for local resources and for Server "http://" .
Step 3 : In Code Behind we have to enable EnableExternalImages.
            ReportViewer1.LocalReport.EnableExternalImages = true;
Now, Run the report. If Image is not visible than we have to follow step 4.
Step 4 : We may need to bypass proxy settings to allow the external image to appear. Add following setting to web.config file.
 <system.net>
        <defaultProxy>
            <proxy proxyaddress ="http://proxyservername:80" usesystemdefault="False" bypassonlocal="True">    </proxy>
        </defaultProxy>
    </system.net>

Wednesday, April 4, 2012

Value does not fall within the expected range in rdlc

Whenever we encountered by this error in rdlc, it simply means that we are assigning whole dataset to ReportDatasource.

 ReportDataSource rds = new ReportDataSource("MinQtyItem_sp_MinQtyItem", ds);


To overcome this issue just tell ReportDataSource which table of DataSet She/He has to load.

 ReportDataSource rds = new ReportDataSource("MinQtyItem_sp_MinQtyItem", ds.Tables[0]);

Monday, March 26, 2012

Multiple Invoice


 This example illustrate how to generate report for Multiple Invoice. Multiple Invoice is a concept where table data changes  accordingly invoice no but header and footer will be same.
Step 1 : Now start from Creating Stored Procedure which fetches data from table or view for invoice.
Step 2 : Create DataSet. and  Add new RDLC. If you need help in doing this then goto HELP
Step 3 : Add LIST from Report Items

Step 4 : Right Click on Blank Area of List then goto properties.

Step 5 : Choose Data set Name. Click “Edit Details Group” button. In General Tab  Select in Group on the expression value on which you want to group. Parent group is optional.Check “ Page Break at End”  option.

Step 6 : Now you have to put all information in the list area.In my sample report I have a header section in body which will change a/c to  Invoice No.
Drag n Drop Textbox from ReportItems and then Drag n Drop field values to related textboxes.

Step 7 :  Drag n Drop Table.

Step 8 : Now Drag n Drop the fields  to detail section which u want to show in table format.

Step 9 : To add new column to table right click on any column and do whatever you want.

Step 10  : Reduce the width of textbox of table from its properties.

Step 11  : To view sum of any field of table just drag n drop same field to its footer section.
 Step 12 : To calculate VAT put formula in texbox's expression.

Step 12 : From Report Menu Add Header and Footer. 
Step 13 : Design Header and Footer Section a/c to your need.


Now Add ReportViewer to aspx and connect it to RDLC.If you need elaborate description  for then read Basic RDLC
Finally view report in browser  and  output will be like this.

Now here is the thing you are looking for :

Friday, February 17, 2012

An error has occurred during report processing. Exception has been thrown by the target of an invocation. Failed to enable constraints. One or more rows contain values violating non-null, unique, or foreign-key constraints.

Yesterday I was using RDLC to create a matrix report and encountered by this problem
 "  An error has occurred during report processing.
        Exception has been thrown by the target of an invocation.
            Failed to enable constraints. One or more rows contain values violating non-null, unique, or foreign-key constraints."
Basically this problem arises if a primary or foreign key defined in Table Adapter of DataSet which is used as Data Source for Report.
To resolve this just go to the relevent dataset and search for the primary key and just delete that.


Hope this will help you.

Friday, January 27, 2012

Formatting RDLC

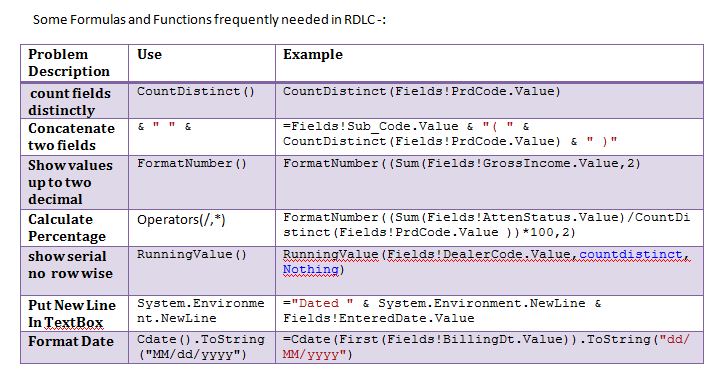
To format matrix report select desired row or column then goto its properties and set background color, forecolor, font, textalign etc as per your requirement.


To limit value upto two decimal places write down below code to your desired column.
 To show serial no  row wise write down below code to 1st column.
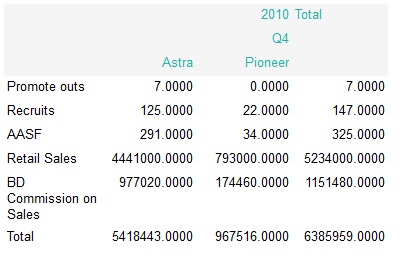
After Implementation of these formatting now report will look like this :

Thursday, January 26, 2012

Passing Parameters to RDLC

To pass parameters to rdlc write down below code to the code behind

ReportDataSource rds = new ReportDataSource("UnitPerformanceDataSet_sp_RptUnitPerformance", ds.Tables[0]);
ReportViewer1.LocalReport.DataSources.Clear();


ReportParameter p1 = new ReportParameter("Showdt", "Date : " + DateTime.Now.ToShortDateString());
ReportParameter p2 = new ReportParameter("FromDt", "From : Year  " + Session["FromYear"].ToString() + "      Week No. " + Session["FromWeek"].ToString());
ReportParameter p3 = new ReportParameter("ToDt", "To : Year  " + Session["ToYear"].ToString() + "  Week No. " + Session["ToWeek"].ToString());
ReportParameter p4 = new ReportParameter("Zone", "Zone : " + Session["Zone"].ToString());
ReportParameter p5 = new ReportParameter("Unit", "Unit Name : " + Session["Unit"].ToString());


this.ReportViewer1.LocalReport.SetParameters(new ReportParameter[]{p1,p2,p3,p4,p5});


ReportViewer1.LocalReport.DataSources.Add(rds);
ReportViewer1.LocalReport.Refresh();
Now add parameters to rdlc.Open RDLC --> Click Report Menu
    

In VS-2008 You ll get Report Parameters option from here.


 But in VS-10 u wont get it here.U have to open ReportData tab --> Select Parameter --> Click New

A window ll popup, here u add parameters one by one which is defined in code behind.
Now DragNDrop a textbox from ReportItems --> Right Click --> Click Expression
Write down this code snippet in blank area after "=" and click ok.

Now browse and see the results.

You can Download Sample Code from Here

Matrix Report via RDLC

Step1: Define a new DataSet Class.

For that Right Click on App_Code Folder-->Click on Add New Item-->Select Dataset From Templates--->Click On Add.

Step 2 :  Before proceeding to Step 2 You have to create your stored procedure which is used to bind the Dataset.Now on the blank area of created xsd file Right Click --> Click Add --> Click Table Adapter


Step 3 : Choose Your Connection String and Click Next

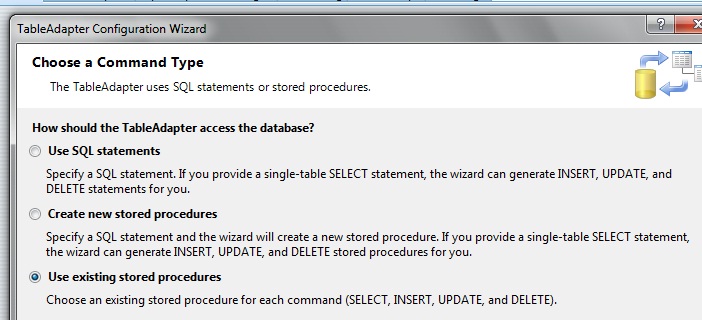
Step 4 : Choose Use Existing Procedure and click Next

Step 5 : In Select DropDown Choose your Stored Procedure--->Finally Click On  Finish.
And Don't forget to save the changes you make.

Step 6 : Now its time to create the rdlc file. For this click on New Item--> Select Report From Templates-->Click OK


Step 7 : Now from ToolBox drag n drop Matrix

 I will write down the steps to design the given report format.

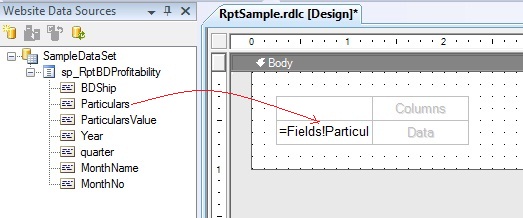
Step 8: Drag n Drop Particular Field from WebSite Data Sources to Row of Matrix.
Then Drag n Drop Year Field to Columns of Matrix and then Right Click and then Click On Insert Group.

Now in General Tab Select the Field which You want to display under Year.Then in Parent group Select Year.


Now Right Click on quarter column and insert a new group for BDShip whose Parent Group will be Quarter.
Then Drag n Drop ParametersValue to data region.
For ColumnWise Total right click on Year column then select SubTotal and for RowWise Total right click on Particular column and click SubTotal.
Now your report looks like this .

I ll cover passing parameters and formatting in my next article.Right now concentrate on basic report.But dont forget  to click save button for rdlc.Now create an aspx where just drag n drop ReportViewer to your page. You ll find ReportViewer in Reporting tab of ToolBox.In the top notch of ReportViewer select rdlc.

Now its time to write some code.Move to the .cs page (code behind of ur aspx). In cs at first add this namespace " using Microsoft.Reporting.WebForms;" and then add below function and call it from proper place.


 public void BindReport()
    {
        SqlCommand cmd = new SqlCommand("sp_RptUnitPerformance", con);
        cmd.CommandType = CommandType.StoredProcedure;
        cmd.Parameters.AddWithValue("@FromWeek", Session["FromWeek"].ToString());
        cmd.Parameters.AddWithValue("@ToWeek", Session["ToWeek"].ToString());
        cmd.Parameters.AddWithValue("@FromYear", Session["FromYear"].ToString());
        cmd.Parameters.AddWithValue("@ToYear", Session["ToYear"].ToString());
        cmd.Parameters.AddWithValue("@BDId", Session["BDId"].ToString());
        cmd.Parameters.AddWithValue("@Zone", Session["Zone"].ToString());
        cmd.Parameters.AddWithValue("@UnitName", Session["Unit"].ToString());
        if (con.State == ConnectionState.Closed)
            con.Open();


        DataSet ds = new DataSet();
        SqlDataAdapter adp = new SqlDataAdapter(cmd);
        adp.Fill(ds);


        ReportDataSource rds = new ReportDataSource("UnitPerformanceDataSet_sp_RptUnitPerformance",              ds.Tables[0]);
        ReportViewer1.LocalReport.DataSources.Clear();
       
        ReportViewer1.LocalReport.DataSources.Add(rds);
        ReportViewer1.LocalReport.Refresh();
    }


UnitPerformanceDataSet_sp_RptUnitPerformance  -: To get this datasource name goto the source of your aspx  in datasource tag of reportViewer 

 <DataSources>
                    <rsweb:ReportDataSource DataSourceId="ObjectDataSource1" 
                        Name="UnitPerformanceDataSet_sp_RptUnitPerformance" />
 </DataSources>


Your page will be lokk like this -:
Now browse ur page and see the results.For further query feel free to contact me.To know how to pass parameter and format output read other articles.


You can download Sample Code from Here